


I'm a self taught baker and cake designer. Everything I've learned is from books, TV, videos and trial & error...alot of error; but the things I do well I'm more than happy to share and believe me, if I can make it...
You Can Make It: Sugar Mama's Yummy Butter Cookies
 The cookies were ordered by Events by WE in Cincinnati, OH. I love making them so much I thought it'd be a great opportunity to share.
Who doesn't love cookies? I don't know but I don't want to meet them. I don't get them to often but when I do get an order for cookies, I always make a little extra for myself for a little snack. These cookies are great smeared with cream cheese!
I love this recipe because the cookies aren't too sweet, so they compliment royal icing and fondant well. There isn't alot of prep time or ingredients. Try it and let me know what you think!
* This recipe yields about 30 2" cookies
* I like to always make a fresh batch and use it right away but you can store the cookie dough in the fridge for 3-5 days. You can also freeze it for about 6-8 weeks but I wouldn't recommend it. Fresh is alway best.
* This recipe can be doubled but I wouldn't recommend cutting it in half.
And now with out further ado...
Sugar Mama's Yummy Butter Cookies
 Ingredients:
3 cups flour
1 1/2 tsp. baking powder
1 stick unsalted butter (room temperature)
1 stick salted butter (room temperature)
1 cups sugar
1 egg
1 tsp. vanilla extract
1/2 tsp. salt
Materials:
mixing bowls, measuring cups & spoons
knife & cutting board
Stand Mixer, Mixing Bowl, Paddle and Dough hook Attachment
Rubber Spatula
Wax Paper
Cookie Baking Sheets
Cookie Cutter
Rolling Pin
Directions:
Preparing the cookie dough:
Chop butter into chunks and combine with the sugar in the bowl of a stand mixer with a paddle attachment. Beat on high/med speed until the butter/sugar mixture is light and fluffy.
While the butter and sugar are mixing combine all the flour, baking soda, salt and sift together. To save time I just mix the ingredients quickly with a fork.
On ce the butter/ sugar mix has the desired amount of fluff, add the egg and the vanilla. Continue to mix until incorporated. Then add your dry ingredients a half a cup at a time, scraping down the bowl with a rubber spatula after each addition.

When the paddle attachment is struggling to mix your cookie dough (be careful not to burn out your motor), switch to the dough hook attachment. Allow the hook to knead the dough into a nice ball that catches all the batter/dough stuck to sides of the bowl.
Yay, cookie dough! Now you can stop here, eat the cookie dough with a bowl of ice cream or continue to the next steps.
Baking Cookies:
Move all of your oven racks to the top slots and preheat your oven to 300 degrees... yes really, 300 degrees.

Split your dough ball in half or thirds. Take one portion of dough and place it between two sheets of wax paper on your largest cookie sheet. Use your rolling pin to roll the dough into a flat sheet.
If your coo kie sheet is sliding all over the counter top put a square of non slip grip matting, like the kind you use to line your drawers, underneath the sheet and it will stay put.

Use you cookie cutter to cut out the cookies then transfer the wax paper to a new cookie sheet and stick the whole thing in the freezer or fridge. Do the same to the reamining dough and by the time you've finished the last batch, the first batch should be cold.
Take a coo kie spatula or offset spatula and remove the cold cookies from sheet and arrange them on new sheets no less than a half inch apart. You should probably have a copious amount of cookie sheets. Toss the remaing dough in a bowl so you can keep rerolling and cutting more cookies until the entire batch is done.
Once you have all of your cookies on sheets you can begin to place them in the oven. Usual ly you bake butter cookies for 8-10 minutes at about 350 0r 375. I prefer to bake them for 15-20 minutes at 300 because you get a more even golden color and you're less likely to forget them in the oven and burn them, not as if that has ever happened to me, but I've heard stories...
Once the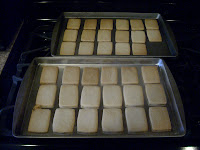 y're done cool them on the stove top, cooling rack or do a quick chill in the freezer. Remove them carefully with a cookie or offset spatula.
Three guesses as to where that missing cookie went.
Ta-Da! Sugar Mama's Yummy Butter Cookies. Now you can stop here and eat the cookies with a bowl of ice cream or you can decorate and share them.
Let's play a little if & then:
if dough is too loose, then there wasn't enough flour or too much butter. I could also be too warm in your kitchen. You can knead flour into the batter or wrap in plastic wrap and chill in the fridge.
if your cookies are dark brown around the edges and doughy white in the middle, then your cookies are too close to the bottom of the oven or the oven temp is too high.
if you have cooled your cookies for a while and they're still stuck to the pan, then pop them in the freezer for a few minutes. They'll fly right off the sheet.
Unfortunately, these are the only mistakes I've made and know how to fix. If anyone else has tips I will gladly update them.
Well it's "bake" to work for me.
Thanks for tuning in. Until Next Time!
 The cookies were ordered by Events by WE in Cincinnati, OH. I love making them so much I thought it'd be a great opportunity to share.
 I love this recipe because the cookies aren't too sweet, so they compliment royal icing and fondant well. There isn't alot of prep time or ingredients. Try it and let me know what you think!
* This recipe yields about 30 2" cookies
* I like to always make a fresh batch and use it right away but you can store the cookie dough in the fridge for 3-5 days. You can also freeze it for about 6-8 weeks but I wouldn't recommend it. Fresh is alway best.
* This recipe can be doubled but I wouldn't recommend cutting it in half.
And now with out further ado...
Sugar Mama's Yummy Butter Cookies
 Ingredients:
3 cups flour
1 1/2 tsp. baking powder
1 stick unsalted butter (room temperature)
1 stick salted butter (room temperature)
1 cups sugar
1 egg
1 tsp. vanilla extract
1/2 tsp. salt
Materials:
mixing bowls, measuring cups & spoons
knife & cutting board
Stand Mixer, Mixing Bowl, Paddle and Dough hook Attachment
Rubber Spatula
Wax Paper
Cookie Baking Sheets
Cookie Cutter
Rolling Pin
Directions:
Preparing the cookie dough:

Chop butter into chunks and combine with the sugar in the bowl of a stand mixer with a paddle attachment. Beat on high/med speed until the butter/sugar mixture is light and fluffy.
While the butter and sugar are mixing combine all the flour, baking soda, salt and sift together. To save time I just mix the ingredients quickly with a fork.
On
 ce the butter/ sugar mix has the desired amount of fluff, add the egg and the vanilla. Continue to mix until incorporated. Then add your dry ingredients a half a cup at a time, scraping down the bowl with a rubber spatula after each addition.
When the paddle attachment is struggling to mix your cookie dough (be careful not to burn out your motor), switch to the dough hook attachment. Allow the hook to knead the dough into a nice ball that catches all the batter/dough stuck to sides of the bowl.
Yay, cookie dough! Now you can stop here, eat the cookie dough with a bowl of ice cream or continue to the next steps.
Baking Cookies:
Move all of your oven racks to the top slots and preheat your oven to 300 degrees... yes really, 300 degrees.

Split your dough ball in half or thirds. Take one portion of dough and place it between two sheets of wax paper on your largest cookie sheet. Use your rolling pin to roll the dough into a flat sheet.
If your coo
 kie sheet is sliding all over the counter top put a square of non slip grip matting, like the kind you use to line your drawers, underneath the sheet and it will stay put.
Use you cookie cutter to cut out the cookies then transfer the wax paper to a new cookie sheet and stick the whole thing in the freezer or fridge. Do the same to the reamining dough and by the time you've finished the last batch, the first batch should be cold.
Take a coo
 kie spatula or offset spatula and remove the cold cookies from sheet and arrange them on new sheets no less than a half inch apart. You should probably have a copious amount of cookie sheets. Toss the remaing dough in a bowl so you can keep rerolling and cutting more cookies until the entire batch is done.
Once you have all of your cookies on sheets you can begin to place them in the oven. Usual
 ly you bake butter cookies for 8-10 minutes at about 350 0r 375. I prefer to bake them for 15-20 minutes at 300 because you get a more even golden color and you're less likely to forget them in the oven and burn them, not as if that has ever happened to me, but I've heard stories...
Once the
 y're done cool them on the stove top, cooling rack or do a quick chill in the freezer. Remove them carefully with a cookie or offset spatula.
Three guesses as to where that missing cookie went.
Ta-Da! Sugar Mama's Yummy Butter Cookies. Now you can stop here and eat the cookies with a bowl of ice cream or you can decorate and share them.
Let's play a little if & then:
if dough is too loose, then there wasn't enough flour or too much butter. I could also be too warm in your kitchen. You can knead flour into the batter or wrap in plastic wrap and chill in the fridge.
if your cookies are dark brown around the edges and doughy white in the middle, then your cookies are too close to the bottom of the oven or the oven temp is too high.
if you have cooled your cookies for a while and they're still stuck to the pan, then pop them in the freezer for a few minutes. They'll fly right off the sheet.
Unfortunately, these are the only mistakes I've made and know how to fix. If anyone else has tips I will gladly update them.
Well it's "bake" to work for me.
Thanks for tuning in. Until Next Time!


