Wednesday, February 24, 2010

Guest Blogger: Tamara from Events by WE

Every one loves getting guests and the Sugar Mama NYC blog is no exception. It's great to hear point of views, stories and great info from the world beyond my kitchen (and laptop). So when I find someone that I enjoy hearing from, I invite them (read: stalk them until they say yes) to pop in here and share with all of you. If you're interested in guest blogging, feel free to leave your info: name, email, blog link and maybe I'll be able to hang up my binoculars and night vision goggles. I hear the laws on stalking are getting kinda strict...
Now, without further ado. Introducing...

Guest Blogger: Tamara from Events by WE


Hello, my name is Tamara from Events by WE. I am an Event Planner from Cincinnati, though my best friend and business partner, Alycia and I plan events all over the country. I was recently asked by Michelle, to give you my take on the wedding cake trends for 2010 in my area of the world.

First, I would like to tell you that, I'm all about showing off your personal style. I'm talking about showing your guests something new. Maybe, give your guest a runway show. Brides don't leave anything untouched! I had to get that out.

Next, let me tell you that, the themes and colors of this season's ceremonies are turning away from traditional pastels and pure white cakes in the favor of BOLD and BRIGHT hues. The colors that my brides are looking at are orange and turquoise and the many shades of purple leading the pack. Brides here are not afraid too match their bridesmaids dress color with their cake, a detail which can complete the perfect look for an outdoor reception. I can also tell you that, fresh fruits are definitely making an impact on wedding cake designs this year. More brides than ever are asking about fresh fruits. I'm talking about peaches, blackberries, strawberries and OMG, my favorite...mangoes! Brides are really wanting these fresh fruits to embellish their cakes.

And for you Brides that are asking yourself, "Are cupcakes going somewhere soon?" I'm telling you, "No." Cupcakes are getting an invitation too the celebration and they are coming in a class that stands alone. Here is the thing about cupcakes, they are are just to cute to do without. I had a bride ask "If I have a cake, can I still have cupcakes?" My response was, "Absolutely!" My suggestion would be to, have your wedding planner to set up an over the top dessert bar, with all of yours and your future husband's favorite treats from childhood. Cupcakes can add so much fun to a dessert bar. All of your guests will absolutely LOVE it, and you will be the topic of everyone's morning after conversation.

Again Brides, it's all about your personal style. Whether it's bright colors, cranberries or cupcakes make your wedding cake reflect your inner fabulousness, because that's the real reason the guests are coming to your wedding; to celebrate you.

Later LOVELIES,

Tamara E. from Events by WE
www.eventsbywe.com
www.eventsbywe.blogspot.com
Events By WE on Facebook!
877.513.7772

Monday, February 22, 2010

Cake of the Week: 7 eleven Slurpee Cookies!

So as you may have guessed by reading my blog, I march to the beat of a slight different drummer. So this week's cake of week is actually a cookie. Thirty cookies to be exact.

Last week I got a call from two of the best daughters a father could ask for. Their father was turning 60 and he loves owning and operating several 7 eleven stores. So, as the perfect treat for his celebration they ordered a 7 eleven logo cake with a sugar figurine of their dad holding a coffee cup and as favors, 7 eleven slurpee cookies!

The cake turned out amazingly well and the sugar figurine was one of the best I've created but the cookies were the real star of show.

First, I had to make the cookies and wouldn't you know it; there are no 7 eleven slurpee cookie cutters, so I had to make a cardboard template. Once the cookies were hand cut and baked. It was time to make the Slurpees come alive.

The cup and straw are fondant. The "slurpee" is royal icing. The details are hand painted, fondant and royal icing.

The cookies to for-ever to finish, but I loved every minute of making them because I wasn't sure I even could when I said yes to doing them.


Well it's bake to work for me...

Thanks for tuning in!

Wednesday, February 17, 2010

Sugar Mama NYC's Giveaway: Designs by Alicia P.

Every one loves getting free stuff and giving it away is even more fun! Sugar Mama NYC will host giveaways as often as possible featuring the coolest stuff we can find.
It's easy to enter: Just click on one of the links below. Enter your info, the name of the giveaway featured in the title above and your give away entry. Best of luck in Sugar Mama NYC's Giveaway!


Today's Giveaway:
Giveaway Name: Designs by Alicia P.
Giveaway Entry: This is our first giveaway so we'll make it nice and easy. Tell us your favorite flavor cake.
Giveaway Prize:
Gorgeous pair of handmade suede earrings designed by Alicia Pillar of Designs by Alicia P.
Retail Price: $ 40.00

Giveaway ends March 16th 2010!

About Designs by Alicia P.
Alicia Piller is a Chicago based designer/artist currently living in New York City. Her unique business (body of work) consists of paintings, suede & beaded jewelry, and hand-painted clothing; all made by Alicia P. herself. Extensive travel, family, and her knowledge of fine arts and anthropology (B.A. from Rutgers University, in both), have helped to shape her style and designs into a melting pot of cultural influences, which she chooses to share with the world.

Alicia's suede and beaded jewelry are not just single or multi-stranded suede cords with a few beads on it. These pieces are literally works of art, in which she intertwines crystals and semi-precious beads into her lightweight suede creations.


**We love comments, but leaving one below will not enter you in the giveaway. You must submit an entry form by clicking the link below. Be sure to enter the GIVEAWAY NAME & GIVEAWAY ENTRY to qualify**


Enter Here:
Read the Rules... or
Skip to the good stuff!

if the link is not working cut and paste this url to your browser http://sugarmamatreats.com/giveawayblogentryform.html

Tuesday, February 16, 2010

Cake of the Week: Winter Snowflake Cake

This week's beauty was created for very lucky 16 year old celebrating her sweetest birthday in Queens. The theme of the cake was so appropriate because we just had a major snow storm and it was still piled high wherever you went.

This cake marked the tail end of my busiest weeks to date: 11 orders! This may not sound like much but I have just these two hands and sometimes my office manager jumps in to make royal icing or help paint. It was also one of my biggest, not counting the behemoths I'm sometimes called upon to make for SNL. She was 12" around the bottom tier and about 20" high, not including the 16 and the snowflakes.

This cake could also be the most delicious. The bottom tier was Red Velvet with Cream Cheese Buttercream, the middle was Butter Cake with Vanilla Buttercream and the top was Chocolate with Chocolate Buttercream; all Swiss Meringue, of course.

The construction and design was fairly straight forward. The hardest part was keeping the cake white while covering and stacking. Once the cake was covered and stacked, I finally got bust out my shiny new snowflake cutters that I ordered from Lindy Smith.

After the fondant design was complete, I finished the look by airbrushing a pearlescent shimmer on every snowflake, stripe and snowball. I then followed up with a mixture of pearlescent shimmer and a hint of blue to match the party decor.

After discovering to my delight that my new boxes fit this giant cake perfectly. We packed her into the car and took off. After passing the venue twice, clearing a huge snowbank and navigating some tricky stairs we delivered the cake safe and sound to a very excited and beautiful 16 year old.


Well it's bake to work for me!
Thanks for tuning in. Until next time!

Friday, February 12, 2010

You Can Make It: Sugar Mama's Yummy Butter Cookies

I'm a self taught baker and cake designer. Everything I've learned is from books, TV, videos and trial & error...alot of error; but the things I do well I'm more than happy to share and believe me, if I can make it...

You Can Make It: Sugar Mama's Yummy Butter Cookies

The cookies were ordered by Events by WE in Cincinnati, OH. I love making them so much I thought it'd be a great opportunity to share.

Who doesn't love cookies? I don't know but I don't want to meet them. I don't get them to often but when I do get an order for cookies, I always make a little extra for myself for a little snack. These cookies are great smeared with cream cheese!

I love this recipe because the cookies aren't too sweet, so they compliment royal icing and fondant well. There isn't alot of prep time or ingredients. Try it and let me know what you think!

* This recipe yields about 30 2" cookies
* I like to always make a fresh batch and use it right away but you can store the cookie dough in the fridge for 3-5 days. You can also freeze it for about 6-8 weeks but I wouldn't recommend it. Fresh is alway best.
* This recipe can be doubled but I wouldn't recommend cutting it in half.
And now with out further ado...

Sugar Mama's Yummy Butter Cookies

Ingredients:
3 cups flour
1 1/2 tsp. baking powder
1 stick unsalted butter (room temperature)
1 stick salted butter (room temperature)
1 cups sugar
1 egg
1 tsp. vanilla extract
1/2 tsp. salt

Materials:
mixing bowls, measuring cups & spoons
knife & cutting board
Stand Mixer, Mixing Bowl, Paddle and Dough hook Attachment
Rubber Spatula
Wax Paper
Cookie Baking Sheets
Cookie Cutter
Rolling Pin

Directions:

Preparing the cookie dough:
Chop butter into chunks and combine with the sugar in the bowl of a stand mixer with a paddle attachment. Beat on high/med speed until the butter/sugar mixture is light and fluffy.

While the butter and sugar are mixing combine all the flour, baking soda, salt and sift together. To save time I just mix the ingredients quickly with a fork.

Once the butter/ sugar mix has the desired amount of fluff, add the egg and the vanilla. Continue to mix until incorporated. Then add your dry ingredients a half a cup at a time, scraping down the bowl with a rubber spatula after each addition.


When the paddle attachment is struggling to mix your cookie dough (be careful not to burn out your motor), switch to the dough hook attachment. Allow the hook to knead the dough into a nice ball that catches all the batter/dough stuck to sides of the bowl.

Yay, cookie dough! Now you can stop here, eat the cookie dough with a bowl of ice cream or continue to the next steps.

Baking Cookies:
Move all of your oven racks to the top slots and preheat your oven to 300 degrees... yes really, 300 degrees.

Split your dough ball in half or thirds. Take one portion of dough and place it between two sheets of wax paper on your largest cookie sheet. Use your rolling pin to roll the dough into a flat sheet.

If your cookie sheet is sliding all over the counter top put a square of non slip grip matting, like the kind you use to line your drawers, underneath the sheet and it will stay put.


Use you cookie cutter to cut out the cookies then transfer the wax paper to a new cookie sheet and stick the whole thing in the freezer or fridge. Do the same to the reamining dough and by the time you've finished the last batch, the first batch should be cold.

Take a cookie spatula or offset spatula and remove the cold cookies from sheet and arrange them on new sheets no less than a half inch apart. You should probably have a copious amount of cookie sheets. Toss the remaing dough in a bowl so you can keep rerolling and cutting more cookies until the entire batch is done.

Once you have all of your cookies on sheets you can begin to place them in the oven. Usually you bake butter cookies for 8-10 minutes at about 350 0r 375. I prefer to bake them for 15-20 minutes at 300 because you get a more even golden color and you're less likely to forget them in the oven and burn them, not as if that has ever happened to me, but I've heard stories...


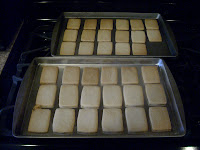
Once they're done cool them on the stove top, cooling rack or do a quick chill in the freezer. Remove them carefully with a cookie or offset spatula.
Three guesses as to where that missing cookie went.


Ta-Da! Sugar Mama's Yummy Butter Cookies. Now you can stop here and eat the cookies with a bowl of ice cream or you can decorate and share them.

Let's play a little if & then:
if dough is too loose, then there wasn't enough flour or too much butter. I could also be too warm in your kitchen. You can knead flour into the batter or wrap in plastic wrap and chill in the fridge.
if your cookies are dark brown around the edges and doughy white in the middle, then your cookies are too close to the bottom of the oven or the oven temp is too high.
if you have cooled your cookies for a while and they're still stuck to the pan, then pop them in the freezer for a few minutes. They'll fly right off the sheet.
Unfortunately, these are the only mistakes I've made and know how to fix. If anyone else has tips I will gladly update them.

Well it's "bake" to work for me.
Thanks for tuning in. Until Next Time!
 
www.flickr.com
This is a Flickr badge showing public photos and videos from Sugar Mama NYC. Make your own badge here.
Copyright © 2009 Blogger Template Designed by Bie Blogger Template Vector by DaPino