Tuesday, February 16, 2010

Cake of the Week: Winter Snowflake Cake

This week's beauty was created for very lucky 16 year old celebrating her sweetest birthday in Queens. The theme of the cake was so appropriate because we just had a major snow storm and it was still piled high wherever you went.

This cake marked the tail end of my busiest weeks to date: 11 orders! This may not sound like much but I have just these two hands and sometimes my office manager jumps in to make royal icing or help paint. It was also one of my biggest, not counting the behemoths I'm sometimes called upon to make for SNL. She was 12" around the bottom tier and about 20" high, not including the 16 and the snowflakes.

This cake could also be the most delicious. The bottom tier was Red Velvet with Cream Cheese Buttercream, the middle was Butter Cake with Vanilla Buttercream and the top was Chocolate with Chocolate Buttercream; all Swiss Meringue, of course.

The construction and design was fairly straight forward. The hardest part was keeping the cake white while covering and stacking. Once the cake was covered and stacked, I finally got bust out my shiny new snowflake cutters that I ordered from Lindy Smith.

After the fondant design was complete, I finished the look by airbrushing a pearlescent shimmer on every snowflake, stripe and snowball. I then followed up with a mixture of pearlescent shimmer and a hint of blue to match the party decor.

After discovering to my delight that my new boxes fit this giant cake perfectly. We packed her into the car and took off. After passing the venue twice, clearing a huge snowbank and navigating some tricky stairs we delivered the cake safe and sound to a very excited and beautiful 16 year old.


Well it's bake to work for me!
Thanks for tuning in. Until next time!

Friday, February 12, 2010

You Can Make It: Sugar Mama's Yummy Butter Cookies

I'm a self taught baker and cake designer. Everything I've learned is from books, TV, videos and trial & error...alot of error; but the things I do well I'm more than happy to share and believe me, if I can make it...

You Can Make It: Sugar Mama's Yummy Butter Cookies

The cookies were ordered by Events by WE in Cincinnati, OH. I love making them so much I thought it'd be a great opportunity to share.

Who doesn't love cookies? I don't know but I don't want to meet them. I don't get them to often but when I do get an order for cookies, I always make a little extra for myself for a little snack. These cookies are great smeared with cream cheese!

I love this recipe because the cookies aren't too sweet, so they compliment royal icing and fondant well. There isn't alot of prep time or ingredients. Try it and let me know what you think!

* This recipe yields about 30 2" cookies
* I like to always make a fresh batch and use it right away but you can store the cookie dough in the fridge for 3-5 days. You can also freeze it for about 6-8 weeks but I wouldn't recommend it. Fresh is alway best.
* This recipe can be doubled but I wouldn't recommend cutting it in half.
And now with out further ado...

Sugar Mama's Yummy Butter Cookies

Ingredients:
3 cups flour
1 1/2 tsp. baking powder
1 stick unsalted butter (room temperature)
1 stick salted butter (room temperature)
1 cups sugar
1 egg
1 tsp. vanilla extract
1/2 tsp. salt

Materials:
mixing bowls, measuring cups & spoons
knife & cutting board
Stand Mixer, Mixing Bowl, Paddle and Dough hook Attachment
Rubber Spatula
Wax Paper
Cookie Baking Sheets
Cookie Cutter
Rolling Pin

Directions:

Preparing the cookie dough:
Chop butter into chunks and combine with the sugar in the bowl of a stand mixer with a paddle attachment. Beat on high/med speed until the butter/sugar mixture is light and fluffy.

While the butter and sugar are mixing combine all the flour, baking soda, salt and sift together. To save time I just mix the ingredients quickly with a fork.

Once the butter/ sugar mix has the desired amount of fluff, add the egg and the vanilla. Continue to mix until incorporated. Then add your dry ingredients a half a cup at a time, scraping down the bowl with a rubber spatula after each addition.


When the paddle attachment is struggling to mix your cookie dough (be careful not to burn out your motor), switch to the dough hook attachment. Allow the hook to knead the dough into a nice ball that catches all the batter/dough stuck to sides of the bowl.

Yay, cookie dough! Now you can stop here, eat the cookie dough with a bowl of ice cream or continue to the next steps.

Baking Cookies:
Move all of your oven racks to the top slots and preheat your oven to 300 degrees... yes really, 300 degrees.

Split your dough ball in half or thirds. Take one portion of dough and place it between two sheets of wax paper on your largest cookie sheet. Use your rolling pin to roll the dough into a flat sheet.

If your cookie sheet is sliding all over the counter top put a square of non slip grip matting, like the kind you use to line your drawers, underneath the sheet and it will stay put.


Use you cookie cutter to cut out the cookies then transfer the wax paper to a new cookie sheet and stick the whole thing in the freezer or fridge. Do the same to the reamining dough and by the time you've finished the last batch, the first batch should be cold.

Take a cookie spatula or offset spatula and remove the cold cookies from sheet and arrange them on new sheets no less than a half inch apart. You should probably have a copious amount of cookie sheets. Toss the remaing dough in a bowl so you can keep rerolling and cutting more cookies until the entire batch is done.

Once you have all of your cookies on sheets you can begin to place them in the oven. Usually you bake butter cookies for 8-10 minutes at about 350 0r 375. I prefer to bake them for 15-20 minutes at 300 because you get a more even golden color and you're less likely to forget them in the oven and burn them, not as if that has ever happened to me, but I've heard stories...


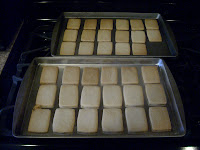
Once they're done cool them on the stove top, cooling rack or do a quick chill in the freezer. Remove them carefully with a cookie or offset spatula.
Three guesses as to where that missing cookie went.


Ta-Da! Sugar Mama's Yummy Butter Cookies. Now you can stop here and eat the cookies with a bowl of ice cream or you can decorate and share them.

Let's play a little if & then:
if dough is too loose, then there wasn't enough flour or too much butter. I could also be too warm in your kitchen. You can knead flour into the batter or wrap in plastic wrap and chill in the fridge.
if your cookies are dark brown around the edges and doughy white in the middle, then your cookies are too close to the bottom of the oven or the oven temp is too high.
if you have cooled your cookies for a while and they're still stuck to the pan, then pop them in the freezer for a few minutes. They'll fly right off the sheet.
Unfortunately, these are the only mistakes I've made and know how to fix. If anyone else has tips I will gladly update them.

Well it's "bake" to work for me.
Thanks for tuning in. Until Next Time!

Thursday, February 11, 2010

A cake wreck even a Sugar Mama could love...

For the fourth time I was called upon by the awesome prop team at NBC's Saturday Night Live to make a prop cake for this week's show starring... Aston Kutcher!

I got the call on Thursday which seems to be my lucky day for last minute cakes.

But instead of being called on to make one giant cake, I was asked to make 4!! And they needed to be delivered to NBC Studios by Noon on Saturday! And they need to be buttercream free! And they couldn't have a sturdy structural support so a) they could be easily knocked down, b) they wouldn't ruin the costumes & c) they wouldn't create a dangerous slippery surface for the performers. The last time I did giant wedding cakes for the show, I saw Steve Martin slip and almost fall in some frosting and I saw my whole career flash before my eyes. No buttercream. Got it.

"ok. cool." I said, trying to contain my panic and focus on the money. Four giants cakes, Three days, No supports, No buttercream... no problem. I can do this. Oh, and yes, I did have other orders for this weekend.

So after 3 days and two nights of no sleep (not true, I got about 6 hours, which I think is worse than no sleep. I equate it to taking a lick of your favorite ice cream cone and then dropping it on floor. You could pick it up and continue eating it, but the consequences are to scary to consider) and using every ingredient in my kitchen and cleaning out my local grocery store of eggs, we were finally done!! The only problem was it was 1:15 pm. We loading up the cakes in my office managers massive Jeep, along with the cupcakes that became this weeks cake of the week and headed to NBC with the speed of one of Zeus' lightning bolts.

We made it there by two. I was met by my favorite stage hands and no one noticed we were late.
We got the cakes upstairs, unloaded and signed for. I saw Jason Sudeikis and Andy Samberg. And best of all I get to keep the money!! Good day, until...

I finally got back to Brooklyn, collapsed on my bed (fully clothed) slept for about 90 minutes when my phone rang. It was SNL. They loved the cakes but want them taller. Would it be possible to add another tier?
Hmmm. There was no more flour, not one egg or a scrap of fondant to be found in the joint. Let's not mention the time to bake four tiers of cake, cool them, fondant them & deliver them. Even I couldn't pull that off.
After I hung up the phone with a heavy heart I got an idea. I called back and suggested taking four huge cakes and making 2 gigantic cakes. I tried to suggest this in way that made it sound so easy that someone else could do it, but to no avail. They wanted me and offered to pay me to come back so of course I said yes.

I rallied to rebuild one cake had to wait around to see if it worked so I would know whether they wanted me to build the second one (which they did)
Even though I was exhausted,I must say hanging out at SNL is always pretty cool. You get to see how the show is put together, see the actors and hang out in the prop room and backstage. I even got to pig out at the NBC commissary which was pretty amazing. The props department is pretty cool too. Every body's really funny and laid back... unless you touch one of the props. I got busted playing with a stunt knife. Sorry, guys.

Rule #1: Don't touch the props.

Out of every SNL episode that has featured one of my cakes this one is definitely a fave. All the extra time and effort was worth the fantastic result. Check it out!


Hope you enjoyed it! Fist fight in the Parking Lot is my new favorite song. :o)

We'll it's bake to work for me!
Thanks for tuning in. Until next time...

Tuesday, February 9, 2010

Cake of the Week: Empire State Building Cupcakes


Well technically this week's cake of the week are actually cupcakes, but these were really cool cupcakes so I thought they deserved some recognition.

The client who ordered these cupcakes was having a New York City themed fete and wanted cupcakes depicted an iconic Big Apple structure. Naturally, The Empire State Building was a perfect choice.

A few days in advance I made outlines of the famous landmark in gumpaste. After a few days of drying I sketched the building itself, by hand, on every single piece. It took me forever, but on the bright side, I finally got to see District 9. Good movie, by the way!

After I baked the cupcakes, I frosted them with some yummy vanilla butter cream and airbrushed each cupcake half gray and half blue, the colors of the party. I stuck a building in each one, snapped some photos, boxed them up and went to bed. It was four in the morning!

Well it bake to work for me!

Thanks for tuning in. Until next time...

Tuesday, February 2, 2010

Cake of the Week: Sleeping Baby Bassinet Cake

This week was apparently baby shower week at Sugar Mama NYC! Clearly, the leader of the bunch was this adorable baby shower cake starring Peaches, the sleeping baby. Yes, I named the rice krispy treat and fondant baby. Thank goodness, I wasn't there when they ate her!
The client that ordered this beauty was very adamant about the cake being very cute, making a statement and incorporating all of the baby shower colors...pink, yellow, blue and brown. Pro-ject!!!

I started by making the cake, with two flavors I know would work together; moist butter cake with a creamy chocolate Swiss meringue buttercream.


I decide to make the bottom tier a pale pastel yellow and the top tier I sculpted into the oval bassinet shape; topped it with a layer of white fondant and covered the sides with soft pastel pink ruffles.So far so good. You can't see the clock in the background but at this time it was 6:27 in the morning. The cakes need to be fresh; the baker doesn't.


Then in was time to make Peaches! Her head and body are made from rice krispy treats and her arms and legs are fondant. I finished her look with a pink hair bow, pink and yellow binky and fondant diaper with pink flower.It's what all the fondant babies in Paris are wearing.


I then set to work make millions and millions of tiny pink accent flowers. Okay, it was like 50, but still. After I attached the hood of the bassinet with royal icing and the brown, pink and yellow polka dots with water, I attached the flowers around the edges of the hood around the base of the cake and any where else I thought could use a spring touch.

Well, it was 9:30 and the cake was finished. I was pleasantly surprised with the way the colors looked. I took tons of photos and place Peaches in a nice sturdy box where she would be safe. Then at about 10:00 a nice gentleman came and took her away. I have yet to find out what became of her, but I hope she was happy... and delicious.

Well, it's bake to work for me.

Thanks for tuning in. Until next time...
 
www.flickr.com
This is a Flickr badge showing public photos and videos from Sugar Mama NYC. Make your own badge here.
Copyright © 2009 Blogger Template Designed by Bie Blogger Template Vector by DaPino